Friday, May 30, 2014

Patriotic Fruit Skewers

For our Memorial Day dessert table, I used a good amount of fruit since it makes it so easy to keep with the red, white & blue theme.  I got on Pinterest & saw this cute idea for patriotic fruit skewers from Family Circle.  They were really easy to make.  They are just blueberries, raspberries & mini marshmallows.  Little tip I learned...wet the skewers just a little bit so that the marshmallows don't get the skewers too sticky, which makes everything much harder to move along the skewer.  Anyway, this was a healthy, easy & pretty cute dessert that is perfect for any patriotic party.  


Thursday, May 29, 2014

Patriotic Red Velvet Cupcakes

For the Memorial Day dessert table, one of the things I made were Patriotic Red Velvet Cupcakes.  Now y'all know me well enough to know that 1) I went to Pinterest for ideas & 2) I totally used boxed cake mix.  : )  My inspiration was these cupcakes from Good Housekeeping & these fruit tarts from the Food Network
So here are my red velvet cupcakes with cream cheese icing (of course).  : )  And here are the cupcakes all dressed up like the American flag.  
I only made 24 cupcakes & I think the flag would have looked more legit had I made more, but I didn't have enough cake mix & my crate was actually the perfect size for only 24 cupcakes...so we made do.  I switched around where the strawberry cupcakes were vs. the plain iced ones a couple of times & finally decided on this look.  For the blueberry cupcakes, I just stuck a bunch of them on top of the iced cupcakes.  For the strawberry cupcakes, I sliced them almost all the way through but left them completely attached at the top of the strawberry, so I could fan them out & cover the entire cupcake.  I am not the biggest fan of blueberries, but I did try the strawberry topped cupcakes & they were delicious.  Strawberries & blueberries are so easy to decorate with for patriotic holidays & you can then count your dessert as a fruit in the food group discussion, right? : )  


Wednesday, May 28, 2014

Patriotic Brownie Bites

For our Memorial Day dessert table, I wanted to keep things patriotic.  So that meant a lot of red, white & blue.  I was already making Patriotic Red Velvet Cupcakes & wasn't sure what else to do.  I thought about these cute little Santa hats that I make from brownie bites at Christmas time & thought i could do a spin on them.  So I took some little brownie bites (I bought mine from Sam's Club since I was running low on time, but if you are feeling super motivated, you can make some in a mini muffin tin) & I put cream cheese icing on top of them.  I then rolled just the sides of the brownie (and the edges of the icing) & stuck a strawberry on top.  They were DELICIOUS.  I mean, can you really go wrong with brownies & cream cheese icing desserts?  Definitely not. :  )


Tuesday, May 27, 2014

Memorial Day Dessert Table

I hope everyone had a fantastic Memorial Day & weekend.  We went to the drive-in for the first time ever, spent a little time at the beach, a little time painting baby girl's nursery & a little time grilling & entertaining with friends yesterday.  Busy, but a really nice weekend. The hubby caught lots of fish when he went on his "work" fishing trip the other week so we decided to grill that when we had everyone over yesterday.  Our friends that came over all brought sides or apps & I, of course, had to make some desserts.  My sweet tooth is out of control these days.  : )  

On to the Memorial Day dessert table.  
 When I started thinking about doing a Memorial Day dessert table, I thought that the perfect place to set it up would be on a small wall in my den.  The wooden map of the US is always hanging on that wall & the table is usually decorated with a humidor, picture frames, candles, etc.  I just moved all that stuff & decorated around the map of the US.  I had the tablecloth & the paper fan decorations leftover from the "Ahoy! It's a Boy!" nautical shower.  I used the white crate at that party on the guestbook table & on the Easter dessert table too.  Crates are just one of those things that are super easy to decorate with.  I have another natural colored one that you would have seen in the Vintage Beer Themed 90th birthday party post, if only the pictures wouldn't have turned out awful.  It's there though, I promise. ; )

The only things besides food that I purchased for this party were the two wooden signs that said "USA" & "America" & the cupcake liners.  Best thing...I got all of them at the Dollar Tree.  Yep, each sign was $1.  And the cupcake liners were 24 for $1.  Strange thing was...when you counted the cupcake liners, there was definitely 35, but I am not mad about receiving extra. : )  And they came with those cute little flags that are on top of the strawberries.  What a deal.  
 For desserts, I made Patriotic Strawberry Brownie Bites...


Some random twizzlers, marshmallows & blueberries to keep with the red, white & blue theme. ; ) 

And some more strawberries, marshmallows & blueberries on the other side too.  

If I throw a lot of fruit on the table with the desserts, that makes the whole thing healthy right? : )  So that was our Memorial Day Weekend.  It was a lot of fun to grill out & spend some time with our friends...and to have a day off work.  Always a good time.  A huge thank you to all of our veterans & active servicemen/women who protect us & all that we love. We are grateful for you not just on the holidays, but every day.

Friday, May 23, 2014

Vintage Beer-Themed 90th Birthday Party

So last Sunday was my grandfather's 90th birthday.  Even at the ripe old age of 90, the man loves beer.  So when my mom called 3 days before his birthday & said they were having a birthday lunch for him & would I do a dessert table, I had to throw things together pretty quickly & naturally went with a vintage/beer theme. The Husband had been out of town the whole week, so it was me at 8 mths pregnant trying to get this dessert table together while watching toddler Addy & her toddler friend who came to visit for the day on Saturday.  It got done however, although all of my pictures are absolutely horrendous.  They had the birthday lunch at my uncle's house.  My uncle lives on the lake, so we love to go out there.  However, his house may be the most absolute worst place to have a party where you want to take a picture of anything.  He is 100% bachelor.  His walls are dark wood, the floors are dark wood, the furniture is dark & there is very little lighting except for from his big-ass TV.  Even worse, the only place I could set the table up was in front of the only light source available...the floor to ceiling windows on this one wall.  What a nightmare.  So there are going to be very few visuals as far as what this party looked like.  Besides the fact you could barely see the table (even in person), it looked pretty cute.  

I know, I know.  Not that you can tell from any of these pictures, but I wanted a vintage look, but with a beer theme.  So I had a crate in the middle (thank goodness the hubby sells wine & I somehow can always find a crate)...a really old book with an antique car sitting on it on the lefthand side & the old wooden suitcase that I have used on the table in the "Ahoy! It's a Boy!" nautical shower & the "Boy Meets World" sip & see party.  Because these were decorations that I was taking over to someone else's house, I kept it very minimal. 
 I did make a little banner that read "Vintage 1924" to honor the year my granddaddy was born.  I just used the same leftover travel scrapbook in light blues & tans from the "Boy Meets World" party.  And yes, I took this picture at my house after the party was over since I got 0 decent pictures at the party. : )
  For the desserts, I wanted to keep them all beer themed.
 So I made Angel Food Cake with Beer Macerated Strawberries
 Salted Beer Caramel Corn

So besides the fact that the lighting was terrible, it was really a fun afternoon.  The weather didn't cooperate, so we couldn't go out on the boat or anything, but it was very nice for our extended family to spend some time together, especially celebrating my granddaddy making it all the way to 90...drinking beer & all. : )

Thursday, May 22, 2014

New Year's Eve 2012

For Throwback Thursday, we are throwing back to New Year's Eve 2012.  I always have to work on New Year's Eve (unless it's on a weekend), so I never have a lot of time to get stuff together.  That being said, I love having our friends over to ring in the New Year & I wanted 2013 to start no other way.  I love black & gold together for parties & something about it just seems very NYE appropriate.  I also love wine & wine corks & you can find wine corks throughout my house in different vases, jars, etc.  So that was the basis of my decorations.
 I have a gold tablecloth from a Christmas many moons ago.  I threw it on a table, took some of the jewel tone candles/candleholders from my guest room & put them on the table.  I put some glittered black, gold & silver Christmas ball ornaments & wine corks in some glass containers & some gold tinsel garland that I am not sure why I even have & put those on the tables too.
 The only thing I purchased for this party were the hanging decorations & the party horns from Party City (oh, and party hats of course, you have to have party hats on NYE).  I went with the hanging decorations because some of them have these cute little clocks in the middle of the paper fans.  Of course they didn't show up in the pictures very well. 
 Because we start celebrating NYE so early in the evening & end so late (I swear it's like the only night we can even make it up past midnight these days), I focus more on good food & hanging out than on the decorations.  And this particular year, our rival football team had a NYE bowl game & we had to be ready to vehemently pull against them. : )  

So we made a ton of BBQ (it is the South after all) & lots of apps & desserts & we watched some football, had some cocktails & rang in 2013 the way I hope everyone did...with those that we love.  Happy Throwback Thursday!


Sunday, May 18, 2014

Frame of Memories...

In the last post about updating the guest room, I mentioned that it was really important to me to keep Oma's things from Germany in our guest room.  I had some empty frames that my mother was getting rid of when she finally decided that her entire house didn't have to be gold & hunter green & I decided to make a picture collage using the biggest frame that I had.   Now these frames wouldn't ordinarily go with the themes in my house, but in the updated guest room, the gold frames look good with the French Provincial furniture & the jewel tones.  

My grandmother was a war bride & met my grandfather when he was serving in the US army in Germany.  They met & fell in love & she moved back to America with him.  Although she lived in America probably another 60 years, she never lost her accent, her connections with her family there, or her love of Germany.  She went back a few times & I always wished I was able to go back with her one day, but unfortunately she got too sick too fast.  She kept lots of things from Germany...old photos, postcards, maps, etc.  I decided to use these things in my collage.  

So first, I took the big gold frame.  I had some bendable wire that I strung across the frame three times, using my upholstery stapler to staple it down to the sides of the frame.  


I then took one of my Oma's old maps...
And stapled it to the back of the frame, leaving the wires in front of the map.
I then took regular clothespins & pinned on the letters, postcards & photos that were my Oma's from Germany.
I also pinned on a few other things of my grandparents like my grandfather's monogrammed belt buckle, his whistle from the war & a big pearl pendant from one of my Oma's necklaces. 
I really love how this turned out & I like being able to look at the things that remind of my grandparents on the wall rather than having them stuck away in a shoe box somewhere or something.  And it always sparks lots of convos with our guests since this is our guest room after all. : ) 


Friday, May 16, 2014

Updated Guest Room

So when I was looking to completely redo my guest room, I definitely did not have a lot of money to spend, but the room was so dark & blah that I had to make some updates.  I had old furniture from my great aunt's house.  I liked it, but it was pretty dark & my grandmother had just passed away & we really wanted to keep her French Provincial furniture in the family.  Since we were updating the furniture, I decided let's just update the entire room.  Best thing about switching out the furniture...I didn't pay for the new furniture & I actually sold the dark furniture at a yard sale & made like $150 because people obviously have much bigger rooms than me that dark furniture works in.  : )  

Besides the furniture, the first thing to go was the wall color.  I hope the person who lived in this house before us never reads this because the wall color was absolutely horrendous.  I'm talking like an awful peach/sherbert color.  It was not cute.  Luckily, they had painted the kitchen a Tiffany blue (which I actually hated in the kitchen & repainted too) & had some leftover.  So the walls went from peach/sherbert to more of a Tiffany blue.  And I ditched the bamboo blinds for that room.  

The lighter furniture & different colored walls really made all of the difference.  SO much better.  The room is small, so the layout had to stay the same.  Something else I updated was the wall above the bed.  We had some older baseball pictures in dark frames, but I really wanted to kick out anything that was too dark from this room.  I decided I wanted to do a wall collage.  Along with my grandmother's furniture, I also had other things that meant something to me that I had wanted to keep when she passed away.  She was so girly.  She loved jewelry & had this gold jewelry box that I used in the room.  I had some other candle holders that were jewel tones that I used in there as well.  She also had a lot of things from Germany, where she was from.  

There are some German books & another small jewelry box from Germany.  My grandfather had passed away about 10 years before & I wanted to make sure things of his were in our home as well.  He was an avid pipe smoker & we have his pipe carousal downstairs.  It was always one of my favorite things.  He also collected matchbooks, whether it be some place in town or somewhere that they visited.  He even wrote off to places to get them to send him some matchbooks.  I  have those matchbooks in a glass candle holder in this room as well.  He never really used the matches, so if this room ever catches fire, I am so screwed.  : ) 

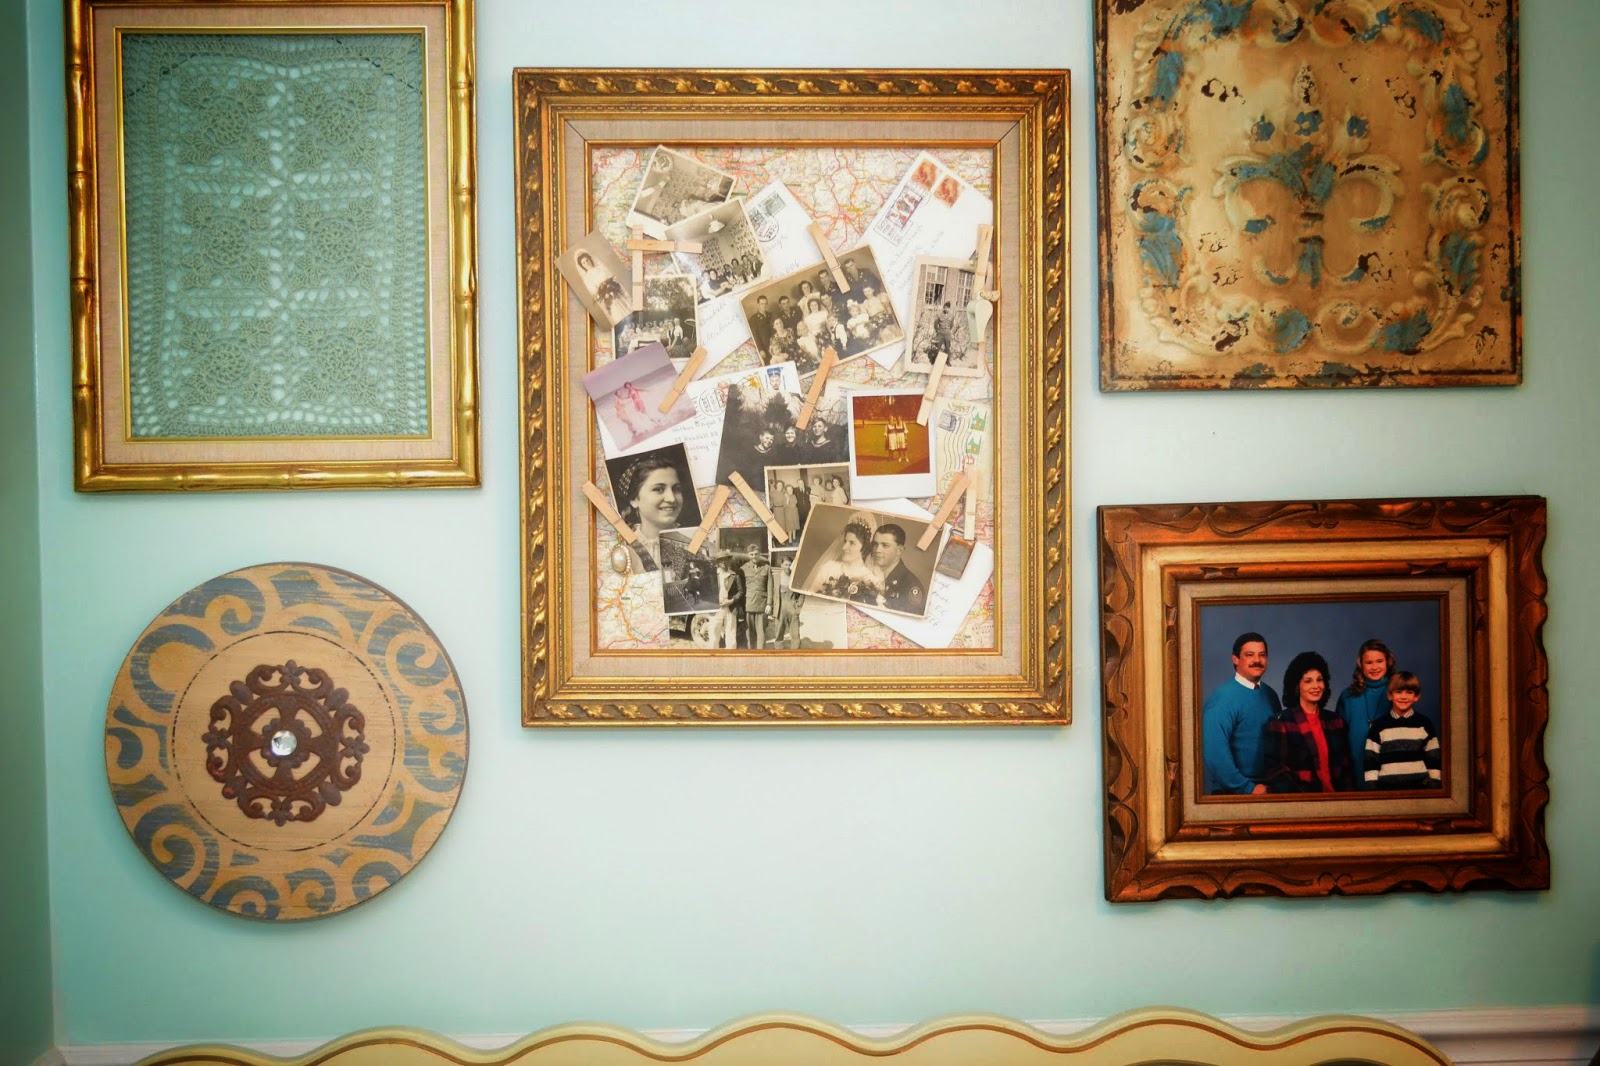
Anyway, the wall collage.  Of course I went to Hobby Lobby to see what they had on sale.  The bottom circle wooden piece was on clearance for about $5 there.  I just liked the look of it.  The square in the top right-hand corner was another piece on clearance for a few bucks that I liked.  I wasn't looking for anything too particular, just the basic brown, golds or blue tones & I wanted it to be cheap.  Both of these fit the bill.  
The other three frames on the top left, middle & bottom right were frames that my mother had taken down at her house & removed the pictures from.  She was getting ready to toss them when I snagged them & decided to use them.  The one in the bottom right is actually an old family photo of us when I was in like middle school.  It isn't a particularly flattering picture but it is so 1990's that I had to keep it.  My husband loves it & always chuckles when he sees it.  The other two frames, I needed to fill.  The one in the top left was the simplest.
I found a crocheted place mat at World Market for a couple of dollars & used my handy dandy upholstery stapler to staple that sucker to the back of the frame & then I just hung it up.  Super simple & I liked the textured look that it created.  For the middle picture, I also used an empty frame & a lot of my grandmother's old things from Germany to create a collage.  You can read more about that picture collage on the Frame of Memories post.
So other than the new blinds we bought, which were under $30 a piece, I really only bought some new shams from TJ Maxx & then the two wall pieces that I bought on clearance at Hobby Lobby & the place mat.  So this room was pretty cheap to redo.  That's definitely the way I like it. ; ) And I was glad that I was able to reuse some things from my grandparents' house that were sentimental & some things from my parents house.  Happy Weekend!

Tuesday, May 13, 2014

Very Hungry Caterpillar Party Decorations

The Very Hungry Caterpillar party had a lot of different components when it came to decorations, as you can see from the (still off-centered) party table below.  
I love banners, so I knew I wanted a birthday banner as the centerpiece.  I talk more about creating the banners on my Very Hungry Caterpillar banner post, but this banner was just a simple one I designed that resembled the hungry caterpillar & said "Happy Birthday Addy!"  I had seen some super cute paper fan ideas for a Very Hungry Caterpillar party on Pinterest, so I borrowed some of those ideas & used some paper fans that I got online at Oriental Trading to resemble the caterpillar & put that above the birthday banner.  
For the table itself, I used a plain white tablecloth & then put a white-with-green-polka-dots on it piece of fabric on top of that.  I then put a plain piece of green fabric in the center.  On the front of the table, I put another banner, this time a photo banner that is pretty similar to the Very Hungry Caterpillar invitations.  You can read more about that banner here.
I wasn't sure what I wanted to put on the sides of the banner, but after some debating, I decided to decoupage some canvases that would go with the Very Hungry Caterpillar theme & be birthday themed too.  If you Google, there are tons of Very Hungry Caterpillar images/printables/etc. 
I found one of the dot background that is the book & the beautiful butterfly that the caterpillar turned into & printed them off, along with a big green "2".  I then used Mod Podge to adhese them to the canvas. I just went over the canvas a few times with the Mod Podge, to make sure it looked even.
One of the best places for printables is on the Make It Cozee blog.  I found the fruit printable you see on the canvas below there.  I made a border all around the edges of the canvas.  I found a plain picture of the sun & then used just used Paint on my computer to add in the caterpillar & Addy's name.  After I Mod Podged all of this onto the canvas, I didn't love how the lines looked, so I added in a thin strip of red ribbon.  
One of the other great things that I found on the Make It Cozee blog were printables for the different foods that the Very Hungry Caterpillar ate, including a description written just like in the book.  They were great.  I just printed them off, put them on red or green construction paper & either taped them to a toothpick to stick in the food, or made a table tent out of them.  They were perfect to describe the food & as part of the decorations.
Other small decorations were a tiny caterpillar & a big butterfly that came with some of the board books & the actual board books themselves.  My mom had also found Addy a larger caterpillar that we used on one side & I found a caterpillar block puzzle at a thrift store that i used on the other.  I also used red, green & polka dot ribbons on the glass containers the food was in.  I found some red caterpillar notepads at the Dollar Tree that were just sprinkled among the table.  
One of the other decorations were the boxes that the ice cream cone cupcakes sat in.  I started with some colorful polka dotted tissue paper that I thought resembled the colorful dots from the book. 
I found some empty envelope boxes that had been tossed in the trash at work & I brought them home with me.  
I then used my Mod Podge (which I decided during this party that I absolutely loved) & started decoupaging.  I did a couple of layers of white tissue paper first since the box was green.  I just coated the box with Mod Podge & added a layer & then another. 
I did about 3 layers of white paper & then waited for it to dry.  I then started with the colorful tissue paper. I turned the paper backwards because I thought the muted colors gave the boxes more of the look that I was going for.
This is what they looked like in the end after all of the coats of Mod Podge & tissue paper.
After the boxes were complete, I cut (aka I got my husband to cut since he doesn't love when I play with sharp objects) some circles into the boxes for the Ice Cream Cone Cupcakes to sit in.  I wasn't sure how the boxes would turn out, but I wound up liking them & besides the few bucks that the Mod Podge (that I used for tons of other projects) & the tissue paper cost, the project was really cheap. 
The last thing I did as far as decorating was I hung a clothesline on the opposite side of the tent from the food table.  There was a local craft store going out of business a few months before this party & they had this Very Hungry Caterpillar themed bulletin board packet.  It was 75% off, so of course I had to have it.  I couldn't quite figure out what to do with it, so I just made a clothesline with it.  You can also see my sweet Addy girl in her tutu hanging out with my mother-in-law & my friend Ally & her sweet girl Gabriela.  Although the decorations were pretty cute, nothing was as cute as sweet Addy girl in her Very Hungry Caterpillar shirt from Rebekah Crisco's Etsy store & her tutu from Christmas & all of her friends at her party.


Very Hungry Caterpillar - Party Invitations Post
Very Hungry Caterpillar - Party Food Post
Very Hungry Caterpillar - Apple Cake & Cupcakes
Very Hungry Caterpillar - Cherry Pie Cupcakes
Very Hungry Caterpillar - Ice Cream Cone Cupcakes
Very Hungry Caterpillar - Guestbook & Favors Post
Very Hungry Caterpillar - Party Banners Post
Very Hungry Caterpillar - Party Decorations Post