Wednesday, April 30, 2014

Very Hungry Caterpillar Party Food

So what did we eat at this Very Hungry Caterpillar birthday party?  Well, pretty much what the hungry caterpillar ate.  
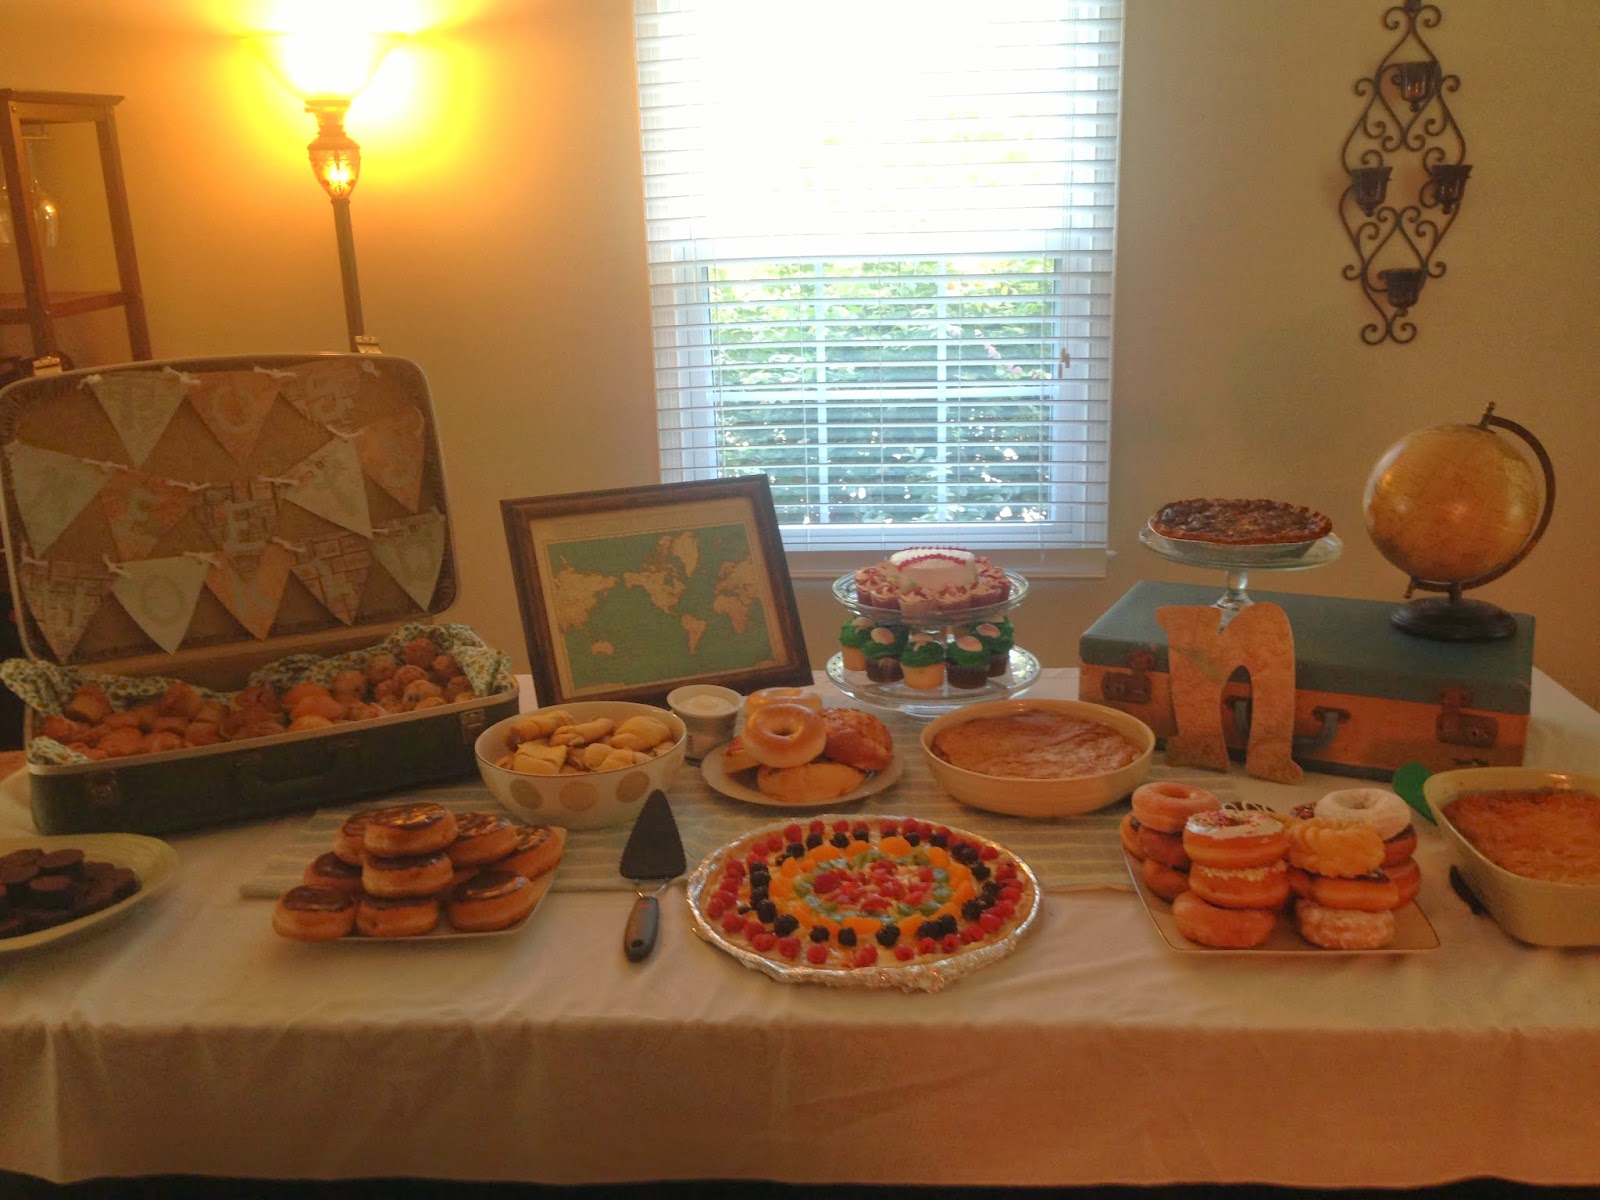
On Monday, he ate through one apple...so I made an apple smash cake and apple cupcakes, which you can read more about here.
  

On Tuesday, he ate through 2 pears...I thought about doing some sort of recipe with pears to represent this, like pear tarts or something, but ultimately decided we had enough sweets & I liked the way the green pears looked piled up in the red pedestal bowl I had gotten from my grandmother's house.  

On Wednesday, he ate through 3 plums...the plums were like the pears...saw some cute recipes, but decided it just wasn't worth the extra time.  So I stacked them up in the green pedestal bowl opposite the pears.  And yes, that sticker still left on the one plum drives me insane.  How it made it onto the table that way, I will never be able to explain.  I must have been in a dream-like state or something.  Pretend you don't see it, k?  : )  

On Thursday, he ate through 4 strawberries...none of the pictures really show the strawberries well, but I just put them in clear larger jars & let people eat them with toothpicks.  Simple enough. 

On Friday, he ate through 5 oranges...this was another fruit stuck whole into a glass container.  I used the little Halos so the kids would eat them & they wouldn't be so big that I could only fit a couple in the jar.  

On Saturday, he ate through one piece of chocolate cake...guys this was probably a cheat more than using the whole fruit was.  These are actually Little Debbie chocolate cakes.  Maybe not homemade chocolate cake...but hey, that caterpillar didn't seem like it was too particular about what it was eating at this point.  I'm sure it would have loved Little Debbie.  ; )

One ice cream cone...for the ice cream cones, I actually made ice cream cone cupcakes courtesy of some great ideas on Pinterest.  You can read here about how I made them & how I will probably try & make them in the future.  : )  

One pickle, one slice of swiss cheese, one slice of salami...for these "foods" the caterpillar ate, I just made meat/cheese & pickle trays.  One tray had the pickles, crackers, salami & cheddar cheese & the other had the pickles, crackers, sausage & swiss cheese.  Nothing fancy, yet people seemed to eat this up the fastest.  I love some salty with my sweets, so I don't blame them.  : ) 

One lollipop...here is where Oriental Trading came in handy.  I talked a lot in the "Ahoy! It's a Boy!" baby shower post about how wonderful Oriental Trading is.  For that party, I got all kinds of decorations , party supplies, snack containers, etc.  One of my favorite things from that party, were the nautical suckers that I got for the kids' snack table.  While I was shopping for the "Ahoy! It's a Boy!" party, I already knew I was planning on the "Very Hungry Caterpillar" theme for Addy's birthday, so I looked around for anything I could use for it.  I found these great butterfly suckers that just happened to have a caterpillar crawling up the butterfly sucker stick.  They were perfect to use as the lollipops that the caterpillar ate.  I also put them in the kids' favor buckets.  They were actually pretty yummy too.  I'm telling you, check out Oriental Trading for some of your party stuff.  So cute & really good prices.  

One piece of cherry pie...well guys, I'm going to be honest with you.  I don't know much about baking pies.  Even though sweets are my weakness, I don't really even eat much pie.  Cakes, cupcakes, cheesecakes...oh yes.  But not really many pies.  So I was not remotely interested in making cherry pies...mostly because I don't like to make things that I won't enjoy eating.  So I decided to make Cherry Pie Cupcakes instead.  You can read here about how that turned out & what I would do differently next time.  You can see a theme with some of my desserts...like I typically would do some things differently to see if I could make them better.  

One sausage...nothing much to tell here. I took kielbasa sausage & cut it up & put it on the trays with the cheese, crackers & pickles.  

One cupcake...so our hungry caterpillar ate a ton of cupcakes...apple cupcakes, ice cream cupcakes, cherry pie cupcakes...even cupcakes that looked like the caterpillar with red cupcakes as the head & green cupcakes for the caterpillar body.  I just took regular cupcakes that were leftover from the other types of cupcakes I made & died a little icing red & a little icing green, covered the cupcakes & dipped them in the crystallized sugar that matched.  I'm not sure if it was the fact that they were regular icing or what, but these cupcakes' icing seemed to melt a little (as you can see in the above picture), where the other cupcakes' icing didn't.  Very strange.  But, it was blazing hot still at the end of Sept/beginning of Oct, so in the South, you just have to be thankful that nothing caught fire.  
One slice of watermelon...as you can see in the picture above, I just cut up watermelon & put it into jars like the majority of the fruit.  

On Sunday, he ate through one nice green leaf...now I guess I could have gone with lettuce or some kind of salad for this one, but that wasn't really keeping with my mostly fruit/sweets theme that the table had going on.  I had two serving dishes that looked like leaves from a great Tommy Bahama set that someone gave us as a wedding present.  I decided that those could be my nice green leaf and that I could put the colored cupcakes that resembled the caterpillar on them.  Besides the cupcakes' icing kinda melting onto the leaf trays...it worked out okay.  

So that's what we ate at the Very Hungry Caterpillar birthday party.  The food for a party with this theme is pretty easy, since the caterpillar kinda lays it out for you.  But, what's fun is that you can still do your own twist on the foods too.  Now that we've talked about the food from this party, why do I feel like I need to eat a cupcake all of a sudden?  ; )  

Very Hungry Caterpillar - Party Invitations Post
Very Hungry Caterpillar - Party Food Post
Very Hungry Caterpillar - Apple Cake & Cupcakes
Very Hungry Caterpillar - Cherry Pie Cupcakes
Very Hungry Caterpillar - Ice Cream Cone Cupcakes
Very Hungry Caterpillar - Guestbook & Favors Post
Very Hungry Caterpillar - Party Banners Post
Very Hungry Caterpillar - Party Decorations Post

Tuesday, April 29, 2014

Very Hungry Caterpillar Party Invitations

So as you saw in the Very Hungry Caterpillar party post  a picture of the invitations for Addy's 2nd birthday.  These were surprisingly fun to make.  
The first thing I did was go out & buy a circle cutter.  I bought the smaller circle cutter from Martha Stewart & I love it so much that I think I will now buy the bigger one when I get another 40% or 50% coupon from Michaels.  Be warned...you need something under this circle cutter when cutting these circles.  You can read on my Pink & Pearl Baptism Party Banner post about how I may or may not have allegedly cut a circle into my desk.  ; )  They make little cutting boards that you can also buy.  I haven't bought one yet, I usually just use a cutting board from the kitchen, but I am thinking of investing in the actual craft cutting board since I think my cutting boards may be prematurely dulling my cutter blades. 

Anyway...I bought the awesome circle cutter & decided to make 6 inch circles for the invitation.  I made red circles for the caterpillar head, then two darker green circles & one light green circle for the caterpillar body.  I then made smaller circles from both colored greens for the eyes.  For the nose, I just cut out a random shape from leftover green paper.  For the antennas, I just free-styled one pair & then traced those to create the others.  Here is a close-up of the heads...

If you have seen any of my "What Will It Bee?" gender reveal party posts, then you know I love a corny little poem.  So, I decided a corny poem was a must for the invitation.  It says "Our little caterpillar is turning two, so you know what it's time to do...Come & join us as we snack & play. Help us celebrate Addy's 2nd birthday!"  Not quite Shel Silverstein, but it will do for a 2nd birthday party : )  
For the background of the printed part of the invitation, I googled "very hungry caterpillar backgrounds", found one that I liked & then just lightened the colors to make it where you would be able to read the print.  I will say that making the circles around the printed words was probably the most tedious part of these invitations, because you really had to make sure the wording would still be centered once made your circle.  It probably would have been easier if I was good at math & could do radius & all that jazz, but I just winged it instead & it turned out fine.  

I used a hole punch & then tied the different parts of the caterpillar together with alternating colored ribbons.  You know from my banners page that I am obsessed with alternating different colored ribbons & using them whenever possible.  I left the ribbons loose enough where I could fold up the caterpillar to mail out.  Anyway...so that's the Very Hungry Caterpillar invitation.  Circle cutter=life saver. : ) 

Very Hungry Caterpillar - Party Invitations Post
Very Hungry Caterpillar - Party Food Post
Very Hungry Caterpillar - Apple Cake & Cupcakes
Very Hungry Caterpillar - Cherry Pie Cupcakes
Very Hungry Caterpillar - Ice Cream Cone Cupcakes
Very Hungry Caterpillar - Guestbook & Favors Post
Very Hungry Caterpillar - Party Banners Post
Very Hungry Caterpillar - Party Decorations Post


Monday, April 28, 2014

Our Very Hungry Caterpillar Turns 2!

I started planning Addy's 2nd birthday about the time her 1st birthday ended.  I was in Target & saw these adorable little buckets that were Very Hungry Caterpillar themed.  Addy LOVES that book & I started thinking about how cute that would be for her 2nd birthday.  Well, I got on Pinterest & low & behold...there are about a million ideas for a Very Hungry Caterpillar birthday party. 
Here is what our final table looked like.  I can tell you that it actually almost hurts me to look at this picture since I have some serious OCD about parties & the table is not centered.  It started out centered, but apparently while I was inside bringing out more food, a fan was brought out & plugged in near the table & people moved the table over to accommodate space for the fan.  It gets blazing hot in the south...even at the end of September, so I didn't mind the fan & really was so busy that I didn't even notice the off-center table...until the pictures & now it is all I can see.  Mental note to continue checking the centeredness of the table at all times during parties.  : ) 

Anyway, moving on.  I knew I wanted to keep the colors of bright red, light green & dark green.  I wanted to use some of the ideas I had seen on Pinterest (because some were just way too cute not to), but do some originals too.  I knew I wanted to incorporate caterpillars as much as possible & that I wanted to serve the foods that the caterpillar eats throughout the book. 
Most of the foods were pretty self-explanatory...oh he ate a pear?  Great, I will serve pears.  But I wanted to change things up just a little bit, especially when it came to the sweets.  I decided that for the apples, ice cream cones & cherry pies...that all of those things would need to involve cupcakes.  ; )  I won't spoil all of that in this post though...check out the links below in a couple of days where you can see how to make apple cupcakes, ice cream cone cupcakes & cherry pie cupcakes.  Oh & cupcakes that are green & red like the caterpillar too...although they are pretty self explanatory.  : )

One of the first things that I worked on were the invitations.  I was worried that these would be a huge pain since cutting circles usually is, but you can see on the post here about Very Hungry Caterpillar invitations...it wasn't so bad & I thought the invitations really turned out cute. 
This party drove my husband nuts because I definitely set up my faux table in our dining room about 3-4 months before this party happened.  There was just so much that I wanted going on with this table, that I really had to visualize it all in person.  Once I decided on the exact party foods, I moved the serving dishes around constantly until I finally got a schematic that I liked. 

The decorations you can read more about here, but were mostly Very Hungry Caterpillar things that Addy had around her playroom, or things that I just made pretty easy on the computer.  One of the banners was done on my computer, while the other was done the same way I did the invitations.  The hanging signs were pretty simple too & you can see how I made them on the decorations post as well.

The party turned out to be so much fun.  Addy girl played & played with all of her friends & everyone seemed to enjoy themselves.  I will say that in the future, unless I know it is going to be a little cooler, I may not make so many cupcakes when it is still so blazing hot outside.  Ahhh, the South.  : )

Very Hungry Caterpillar - Party Invitations Post
Very Hungry Caterpillar - Party Food Post
Very Hungry Caterpillar - Apple Cake & Cupcakes
Very Hungry Caterpillar - Cherry Pie Cupcakes
Very Hungry Caterpillar - Ice Cream Cone Cupcakes
Very Hungry Caterpillar - Guestbook & Favors Post
Very Hungry Caterpillar - Party Banners Post
Very Hungry Caterpillar - Party Decorations Post

Sunday, April 27, 2014

Boy Meets World - Sip & See Party

One of my dear friends from law school & her family live in Boston.  They are the friends who I had the "What Will it Bee?" gender reveal party for.  Little Nolan was set to arrive in October, but surprised everyone in August.  Because they live so far away, they weren't able to come visit until the Spring.  All of their friends down South were so excited to meet him, so I knew we wanted to make the day a special occasion.  I thought that a Sip & See party would be the perfect party for everyone to come see Natalie & Jim & meet baby Nolan.  I decided on the theme "Boy Meets World".  Now some of you of my generation may be disappointed that no, this "Boy Meets World" theme does not involve the awesome 90s show with Corey & Topanga, but a vintage travel theme instead (although I will be the first to admit that show was a classic & one of my favorites).  : )

This first thing I drug out for this party were the vintage suitcases that I found at Steve's great aunt's house.  I had used the wooden blue one at the "Ahoy! It's a Boy!" Baby shower. & loved how it looked.  I put it on one corner of the table & the green suitcase on the other.  I left the wooden suitcase closed & placed a globe & one of the dishes on there.  I used the green suitcase to fill with pastries.  
I chose to keep the party indoors since Nolan was still so young, it was going to be a whole-day affair & the weather that day was supposed to be unpredictable.  So, to my terrible dining room lighting we went.  In looking at pictures of that room, I think I am going to ask Santa to bring me some better lighting for that room.  I gotta be able to take better pics. : )

This party was during a very busy time with me for work, so I kept the decorations minimal. I used the suitcases & the world globe that I had around the house.  I took a frame from around my house & filled it with an old world map out of a vintage atlas book that I found at a thrift store for around $1 or $2.  This atlas book has been great for parties & for my old window project that you can see here.  There is a great old-world look to the maps.  


I also bought a few sheets of vintage map scrapbook paper at Hobby Lobby in tans & blues.  I used one of the sheets to cover an "N" for baby Nolan.  
I used the rest of the scrapbook paper to make a simple banner that read "Boy Meets World".  I used a simple pennant shape & the same stencil letters that I use for pretty much all of my banners.  I used some leftover white rope from the Ahoy! It's a Boy!" Baby shower. banners.  Then I just pinned the banner inside the green vintage suitcase where I had the pastries. 
This was another one of our all-day parties, so we started with brunch food & then just grilled out later.  We enjoyed muffins, bagels, doughnuts (especially Boston Creme Pie doughnuts in honor of our Boston visitors), brownies, quiche, two breakfast casseroles, a fruit pizza & the bacon cream cheese crescent rolls I told you I was obsessed with on the Super Bowl post.  We also had a baseball cake & baseball cupcakes in honor of the first little boy to join our group & in honor of the Red Sox for our Boston peeps.  

It was a wonderful fun-filled day with lots of food, laughs & memories.  Now if only it was full of great lighting for pictures... : ) Happy weekend guys! 


Old Windows...They Are All the Rage...

So I am sure that any of you who have ever been on Pinterest have seen that projects involving old windows are all the rage.  People are painting them, putting pictures behind them...you name it, they are doing it.  So when my parents got new windows at their house, I knew I wanted one of the old windows for some sort of DIY project.  We have established that I can't really paint, so that was not an option for me.  I thought about doing a big picture behind it from our engagement pictures or our wedding, but I'm going to be honest...I am not a fan of big pictures involving me.  My wedding portrait is like an 8x10.  So, I decided a big no on the 'big picture' idea.  I thought about maybe a big print of Addy, but I did this project when she was still a newborn & we already had some big prints of her as a newborn.  

I thought about maybe doing fabric or scrapbook paper, but none of that really did it for me.  I have an old atlas book that I bought at a thrift store for like $1 or $2.  It has old maps of the world, different countries, different states & different cities.  The pages were almost the exact same size as a window pane so that got me thinking about using maps as my window pane DIY project.  I took out the map pages for some of our favorites cities that hold a special memory for us. I just used regular tape to tape the maps onto the back of the window. 

I picked Chicago, where I took Steve as an early wedding present.  Steve is a huge Cubs fan, but had never been to Chicago.  So about a week before we got married, I surprised him at our very last wedding shower with a packed suitcase, plane tickets & tickets to 3 Cubs games.  It was an amazing trip & we absolutely loved Chicago.  We can't wait to go back one day...especially if the Cubs can ever stop being terrible.  : )  
 I also picked Boston, where we went on our first anniversary.  Our friends didn't live there yet, but it was a city that we had always wanted to visit.  It is a beautiful city, full of history.  And I think it is probably the cleanest city we have ever visited & that is a huge plus.
 Los Angeles is where we went for a late 4th anniversary & to celebrate my best friend Rachel's wedding.  She & her now husband moved there a couple of years ago, but we hadn't been able to visit until last summer.  It was a fun trip, made even more fun by the fact that we were there with two of my lifelong best friends...and the hubby of course.  : )
I also put San Francisco in one of the panes.  We went to San Francisco & Napa & Sonoma Valleys for our honeymoon.  We thought San Francisco was just beautiful & we had a lot of fun there.  The hubby sells wine, so naturally we LOVED going to Napa & Sonoma.  Lots of wine is a big plus for us when we are picking a location.  : )  Big tip on visiting wineries...find someone who works for a wine company before you go & take them with you or just take one of their business cards to drop.  ; )  The hubby loves talking about wine, so this was perfect for him & we didn't have to pay for any tasting, which saved us so much money.  
 We got engaged in Central Park in New York City, so I knew I wanted to include it on the window pane.  Because Manhattan is so big & I definitely wanted the map to include Central Park, the NYC map actually took up two window panes.  I put them in the middle & all the others on the sides.
 Here is the finished project.  I didn't clean the window at all.  I liked the old, dirty look.  I also left on the hardware.  To hang it, we just added brackets to the back & hung it on screws we put into the wall.  We made sure to put it on studs, since the window is kinda heavy.
 I really loved this DIY project because it looks pretty neat & lots of people ask about it when they come to our house.  I also loved that it is a way to remember all of our wonderful memories from the trips we have been on.  I loved the way the old atlas book had faded pages & really had that old world look.  The other maps in there are great too.  As you will see in the next post, I used an old world map at my "Boy Meets World" Sip & See party.  If you ever come across an old book with maps, I highly suggest buying it (assuming it's cheap of course, haha), because there are tons of projects you can do with the old maps.
 So if you come across an old window & you can paint a beautiful scene or picture or something, rock it.  If you have beautiful big pictures to use behind the window pane, go for it.  But if none of those work for you, think about using maps from special places you have visited.  It's a nice little trip down memory lane when you are eating your breakfast in the morning.  : )

Saturday, April 26, 2014

Disney Live: Pirates & Princess Adventure

So this post isn't about a party or a DIY, but it is about part of my life as a mom.  When Addy turned 2, I started thinking about whether it was too early to start taking her to shows or not.  I love Broadway, theater, any type of show really.  My mom stuck me in theater classes when I was about 5 & I really enjoyed it.  I am not sure I was that good & obviously didn't stick with it, but it was a lot of fun & really created a love of theater for me.  So I really want to help my girls have that same love.  Of course when I was trying to figure out if I should take Addy or not, I took to Google to look up when other moms had taken their little ones & what their results were.  After doing some research, right before she turned 2 1/2, we decided we would try to give Disney Junior Live Pirate & Princess Adventure a try since it was coming to town.  The show featured Sofia the First & Jake & the Never Land Pirates.  Addy had really just started watching tv & I wasn't even sure she had seen either of the shows before, but the show was super cute.

We weren't sure how she would do at a live show because she had never really been to anything like that where she was supposed to sit still.  Luckily there were tons of kids in the audience moving around & being loud & stuff so it was a fine environment for her to act however she wanted to.  There is no pressure to sit still & be quiet, which is a great thing for toddlers.  She did like watching the princesses & the pirates, even though she is only now sort of learning who Sofia & Jake & those different characters are.  I think it's hard for her to wrap her head around that somebody besides Dora actually exists.  : )  The music was really cute too.

She did pretty good at paying attention & enjoying the show until the last 10-15 minutes of the show.  It was about an hour & a half with a 20 minute intermission in between.  I think she might have done better if we had walked around during the intermission & come back to our seats afterward.  Although then that does give them an opportunity to notice that there is a TON of Disney swag for purchase...so I guess you have to pick your battles.

Addy wore her princess dress from Halloween & looked too cute.  I think one of her favorite parts was dressing up & seeing all of the other kids in their pirate & princess outfits.  She had a lot of fun.  It was expensive to go to the show, almost $100 for the 3 of us.  After this show, I learned a valuable lesson when it was time to purchase our tickets for another show, Disney on Ice.  Definitely go to the box office & get tickets because I saved almost $20 in fees not doing it online.  I had no idea how much we actually paid in "convenience fees" & "service fees".  The box office was right down the street from me, so if it is convenient for you, definitely just stop in.  Another great thing about going to the box office, you can see all of the seats that are still available & their proximity to the stage.  The guy let me pick out our exact seats for Disney on Ice.

But Addy girl did enjoy the show for the most part.  The last 10 minutes, she looked at me & said, "No more pirates, no more princesses. I want to eat".  I started laughing because it was hilarious.  She was definitely ready to go for the next 10 minutes, but we got her to stick it out until the end.

So do you take a 2 year old to a show like Disney Junior Live Pirate & Princess Adventure?  I say definitely.  It may cost a bit & I definitely suggest trying to purchase the tickets at the box office to save on convenience/service fees (seriously, how convenient is paying an extra fee?), but the experience is a great one, even for a toddler.  The colors are great, the songs are great & the characters are great.  It really doesn't even matter if they know who the characters are, Addy seemed to like it just the same.  We were not even close to the action, more in the upper level, because we weren't sure how Addy would react to the characters (I may or may not still be slightly afraid of mascots at my age, haha).  However, she seemed to love them from afar.  Not sure if they walked directly up to her how she would handle it, but we will cross that bridge when we get there.

I also definitely suggest making use of the intermission to walk around.  Hopefully your event center has something to look at besides Disney swag to distract your little one for a while. : )  These types of events are a great way to introduce toddlers to shows because there is no judgment if they talk loudly or squeal & there are tons of other kids their age & of all different ages for them to enjoy the show with.  So if Disney Junior Live Pirate & Princess Adventure comes to your area, I say definitely check them out.  Happy Saturday!


Thursday, April 24, 2014

Squash Casserole

One of my go-to recipes for holidays is a squash casserole.  An old co-worker/friend of mine made this for a holiday get together one time & I just had to have her recipe.  I started making it that year & have continued to make it for pretty much the last 7 years.  I start with the recipe below & usually double it because I am usually cooking for a crowd.  Full Disclaimer: I usually add a tad bit more Cheez-Its & shredded cheese.  I have a cheese problem.  Admitting it is the first step though, right?  Anyway...on to the recipe.

This is what you will need.
2 lbs yellow squash
1 medium onion chopped up
1 8 oz container of sour cream
1 can Cream of Celery soup
1 cup crushed Cheez-Its
2 eggs
2 cups shredded sharp cheddar cheese
4 tablespoons butter

Cook the squash & the onion with salt & pepper.  I used to always saute the squash & onions in a little olive oil in the saute pan with salt & pepper.  For Easter, however, I decided to try tossing the squash & onions in some olive oil & then baking them at 350 for about 30-45 minutes.  I think I liked this better because I didn't have to keep stirring them & trying to get them even & it kept the squash a little firmer when I added them to the casserole.  Don't get me wrong, the casserole is delicious whether the squash falls apart or not, but I think I liked it better with the squash staying together.  Anyway...back to the cooking.  After you cook the squash & onion however you choose to, add the sour cream, cream of celery, cheez-its, cheddar cheese, eggs & butter.  Mix it all together & stick it in a buttered casserole dish.  Cook at 350 for about 45 minutes or until the casserole looks set.  If you decide to double the recipe like I usually do, it will take you a little over an hour for the casserole to set.  Hope you enjoy this cheesy deliciousness.

Butterscotch "Nests" or Haystacks

Easter happened to fall on my grandmother's 88 birthday this year.  I used to stay with my grandparents every weekend growing up & loved my time with them.  She is one of my main influences when it comes to being thrifty.  Every Saturday morning, we would wake up super early & head to the yard sales.  It was always a great time.  My Leila also let me help her cook or make things.  One of the things that we would like to make was "haystacks'.  They are essentially chow mein noodles, butterscotch morsels, peanut butter & peanuts.  There are other ways to make these that include chocolate chips too, but we always just liked to keep them plain & simple.  Since it was Leila's birthday, I thought I would like to make the haystacks we always made.  I decided to do a little Easter spin on them though.  To make the haystacks, take 2 bags of butterscotch morsels (the 11 oz bags) & melt them down.  Add in 3/4 cup of peanut butter & stir until smooth.  If it seems too dry, add in 1-2 tsps of vegetable oil.  Add that mixture to the 5 oz of chow mein noodles & 1 1/4 cups of peanuts, coating them well.  Let harden for at least an hour.  I usually let them sit for at least 2 just to make sure they are super firm. For Easter, I didn't actually feel like adding in the peanuts (aka I had probably forgotten to buy them at the store), so I just rolled on without them & they turned out fine. 

So after I made the regular haystacks, I flattened them out a little & made a little indention in the middle.  This made it easy after they hardened to add in the little egg Whoppers to look like eggs in a bird's nest.  I set up two trays with the "birds' nests" & their little eggs.  In the middle of each tray, I put a nest with a bird (aka a Peep).  Here is what the trays looked like.